Manual for the camera und the microphone
in the lecture rooms
General information
This guide applies to the department's lecture rooms only. These are 2G, 2H, 2i, 3A, 3B, 3C, 3D, and 3F.
All of these rooms are equiped with a camara, a microphone, and a computer. The camera captures the area in front of the backboard/screen. The microphone captures the whole room, though colleagues in the back will have to speak up.
For the time being, you can only use the camera and the microphone with the computer in the lecture room.
Step-by-step guide
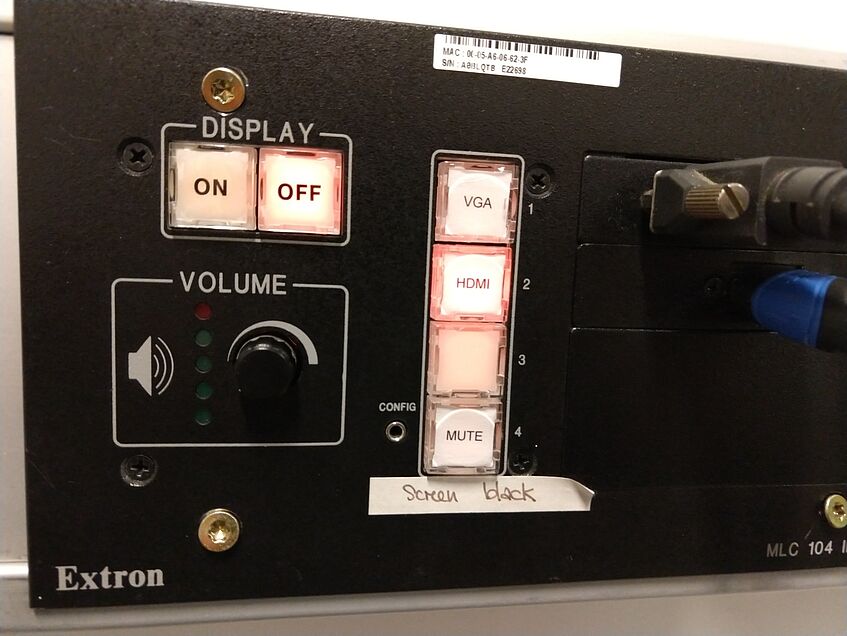
- Locate the control panel, the audio/video (AV) unit is controlled by (see below for a picture).
Lecture room Location of control panel 2i There is a touchscreen on top of the AV unit instead of a panel.
2H, 2G, 3A, 3B, 3C To the left of the blackboard/screen. 3D and 3F On the desk in front of you, close to the monitor. - Disinfect the keyboard, the mouse, and the control panel of AV unit, but not the touchscreen in room 2i. The disinfectant provide must not be used with the monitor or that touchscreen. If you teach in 2i, please disinfect your hands before and after the course.
- Data protection. Inform the students that the course is broadcasted live; also let them know that they have the right to object to being broadcasted at any time. If you want to record a session, you need your students’ permission, and that permission must be obtained by way of a specific procedure in order to comply with the GPDR and university guidelines. Please get in touch with dsgvo.philosophie@univie.ac.at for support.
- Turn on the AV unit. Press the “On” button on the control panel. The AV unit is ready once the panel has stopped blinking. If you do not need to hear or see your students you can skip this step. But keep in mind that you won’t be able to hear yourself in BigBlueButton’s echo test if you do so.
The AV unit is turned on correctly when you see the following (click on the link to see the relevant picture):
2G 2H 2i 3A 3B 3C 3D 3F - Wake up the computer and the monitor if needed. Do so by pressing a key on the keyboard, preferably Shift (⇧).
- Start the session. Open Google Chrome. Log onto Moodle and start a video conference using BigBlueButton. If you need to switch the audio channel, the correct one is named “Freisprechtelefon,” or "ExtronScalerA" for both input and output. The correct channels should be preselected, however.
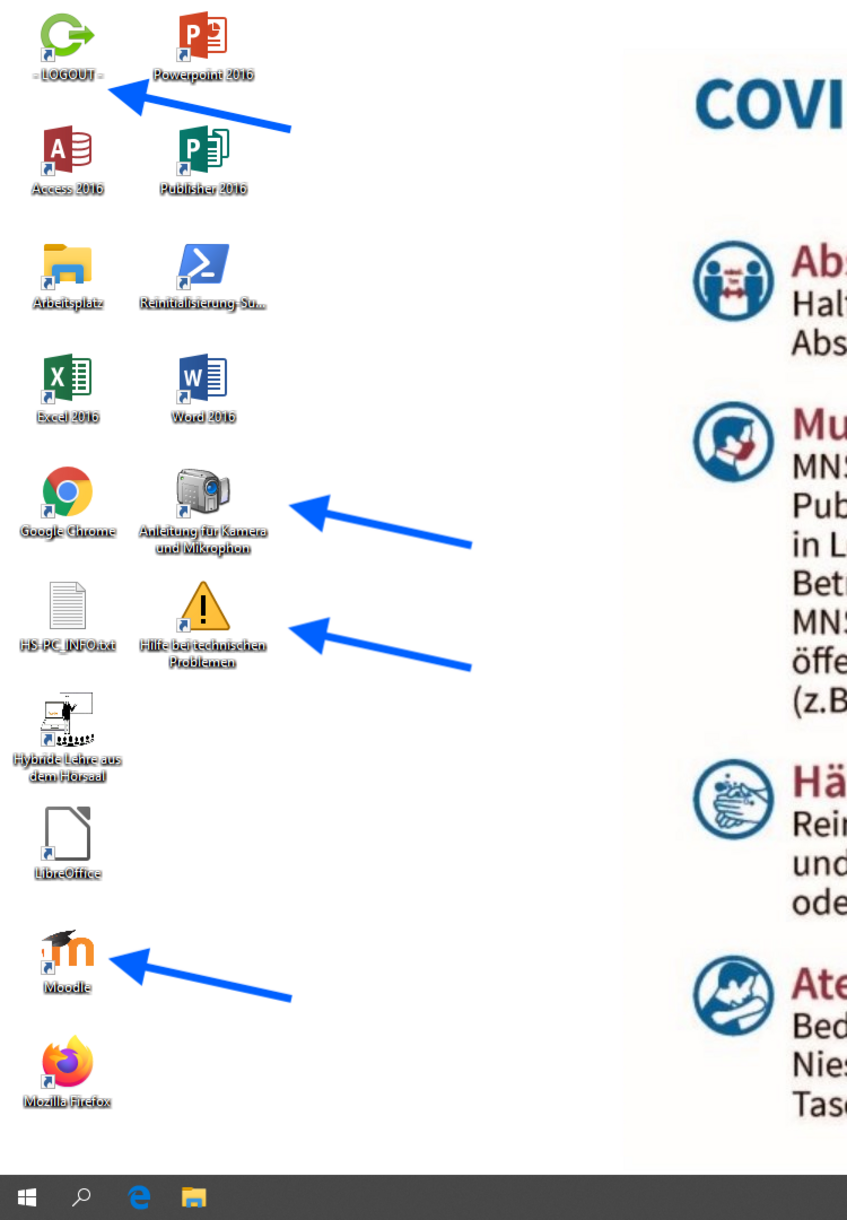
- Once you are done, log off by running the “– LOGOUT -” command in the upper left corner of the desktop. This deletes whatever data you have saved, including any passwords you may have entered. Turn off the AV unit. Neither turn off the computer nor the monitor.

An AV unit control panel.

The desktop of a lecture room computer.
Rules
- Do not change the volume. If you have to, please let us know, so that we recalibrate the AV unit afterwards.
- Do not move the microphone. The AV unit is calibrated for the current microphone position. If you need the microphone to be moved for an event, please get in touch with us.
- Do not touch the cables!
- Do not mute the microphone!
- Students who are present in the lecture room but participate in the online session at the same time must mute their microphone and their speakers or use a head-set.
- Students who participate online should acquaint themselves with our recommendations for video conferences.
Frequently Asked Questions
-
How can I access my files in the lecture room?
- You can bring them on a thumb drive (there are USB ports on the left-hand side of the monitor).
- You can upload them on Moodle.
- You can use u:cloud.
Further Information
Please also consult our information about hybrid and online teaching.
